Desire & Teardrops Forum style tag tutorial
Ladyjai3Creations
Febuary 2016
supplies
a tube
i am using a new tube by © Dirk Richter (Desire)
or one of your choice and a close up
you can purchase this and a license over at
CDO
paint shop pro- i am using version X6 but any version will do
filters
muras meister- copies
eye candy 4000- gradient glow and hsb noise
photo effex- scanlines
Font- Black Lipstick
ok lets start
open new image transparent 600 x 250
using your eye dropper tool pick out a light for foreground and darker for background
flood fill with your darker background
copy & paste your tube as a new layer
muras meister copies wallpaper rotate at default settings
gaussian blur at 10 monochrome checked
motion blur angle 300 strength 100
repeat blur 3 x
duplicate this layer, image mirror, bring opacity of this layer down to 50 then merge down
c&p your close up tube as a new layer, bring opacity down to 50 or less (depending on how it looks)
place on right hand side of tag
c&p your regular tube and place on left side resizing a bit to fit. add DS 2 -2 68 7 is what i used for both tubes
get out your preshape tool and choose your teardrop shape
with these settings
anti alias checked, create as vector, linestyle normal, width 3.00, miter limit 15
turn off your background and draw a medium sized tear drop, convert to raster layer, using your magic wand, click inside the teardrop, selections, modify, expand by 2
c&p your close up as a new layer, move it around so one eye is showing, selections invert, press delete on your keyboard, select none.
drag the eye underneath the teardrop, lower opacity to about 38, when happy with it go to top layer
merge down. duplicate your teardrop multiple times and resize to a small size each time
and arrange how you like. i duplicated 3 x and arranged it and then merged all 4 of them , then i added a slight DS 1 -1 50 5
go to top layer, new raster layer, select all , make background visible again and with your 2 colors make a linear gradient out of the foreground
i used linear angle 90 repeat 2 and the colors i used were 2 blue ones out of her sweater
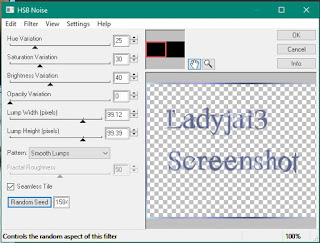
flood fill with your gradient, selections modify , contract by 3, hit delete on keyboard, selections invert, eye candy 4000 , hsb noise with these settings
select none, add a thin gradient glow to frame using the same light color as your frame, add DS 2 -2 68 7
add a little noise if you want to your frame, totally up to you
go to your blurred background and either add blinds or i used photo effex scanlines at default
settings, go to top layer , add your license, copyrights and add your name. the font i used was Black
Lipstick, it is a free font. i also used hsb noise on my name and added noise and added a thin white
gradient glow to the copyrights so it is clearer to see
merge all flatten, save as jpg
thats it! i hope you enjoyed this tutorial and it was easy to follow. i would love to see your results, email them to me and i will showcase them here. thanks for trying my tutorial
Ladyjai3Creations
Febuary 2016
Desire & Teardrops Forum Style Tag Tutorial


