Monday, January 20, 2025

Copper corkboard tutorial


this is an older tutorial i did in 2017 but kind of refined it


Copper Corkboard Tag Tutorial
by Ladyjai3Creations
Febuary 2017


what you need

a tube ( one with a close up)

i am using Sweet Cappuccino 3  by 

©Very Many 

you can purchase this tube at www.verymanytubes.com

but any tube with a close up will do

filters

eye candy 4000- gradient glow & hsb noise ( optional)


font- coffee at midnight demo (Dafont.com)


ok lets start

open a new transparent image 600 x 250

take 2 colors from your tube and make a gradient out of them

angle 25 repeats 2

flood fill your image with the new gradient

adjust add noise uniform 30% monochrome checked

adjust add noise automatic small scratch removal

c&p your tube resize to fit, (65% 2 x) place on right hand side of tag

add a thin white gradient glow to your tube

click on your background c&p your close up change the blend mode to luminance legacy bring down the layer properties to 37 add DS (your choice) add the same gradient glow to your close up

top layer new raster layer select all, flood fill with gradient you made earlier selections modify contract by 2 hit delete on keyboard, selections invert add inner bevel (your choice)

add gradient glow thin the same color as the frame

layers duplicate go to original frame adjust blur gaussian blur at 8 go back to top layer apply penta.com - color dot default settings then merge down add a slight DS

add your copyrights, license info and your own taggers watermark, merge all flatten and save as jpg. add your name and you are done! thanks for trying my tutorial. i hope it was easy to follow

i would love to see your results, send them to me and i will post them here. 


Ladyjai3Creations
Copper Corkboard Tutorial
Febuary 2017


Saturday, January 11, 2025

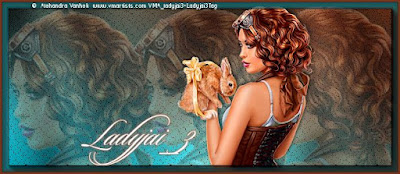
Umbrella tutorial


Umbrella Tutorial
by Ladyjai3Creations
January 2025


what you will need

a tube
i am using Umbrella by ©  Alehandra Vanhek
you can purchase this at www.verymanyartists.com 

paint shop pro (i am using x7)

filters
eye candy 4000- gradient glow (copyright & credits)
tramages- pool shadow 
screenworks- lace screen (default)
AAA frames- foto frame


okay lets start

open a transparent image 600 x 250

take a light color and darker color from your tube, i took the blue and the brown in her outfit

make a gradient out of that

fill your canvas with the gradient angle 20 repeats 0


tramages- pool shadow (default setting)

screenworks- lace screen 

c&p your close up tube resize to your liking, duplicate 2 x then spread across canvas then merge down 2 x 
if you have the filter copies you can use that instead


layers- properties- take down to 30 or so

c&p your tube- resize by 70% 3 x or so, place on right side of tag, sharpen add DS (H 2 V-2 Opacity 68 Blur-7)

image add borders, symmetric checked 2 blue , add borders 3 symmetric brown, add borders symmetric 2 blue

AAA frames- foto frame width 10, opacity 80 all other settings stay the same

image add borders, symmetric checked, 3 brown 

add your copyright and license info, and your own taggers watermark, merge all flatten, save as jpg 

you are done! i hope you enjoyed this tutorial and found it easy to follow


Umbrella tutorial
by Ladyjai3Creations
January 2025


Sunday, December 22, 2024

Santas helper snags


some Christmas snags for you all
i hope you enjoy and have a Merry Christmas and the Happiest of new Years 


Wednesday, September 11, 2024

Lavender Coffee Ashley


Lavender Coffee Ashley
by Ladyjai3Creations
September 2024

what you will need

paint shop pro ( i am using version 17)

a scrap kit i am using Lavender Coffee by Elli's Creations
you can pick it up here https://payhip.com/EllisCreationsscraps


a tube 
the kit has lots of tubes in it but i used Ashley by Zlata_M
you can buy it here  https://picsfordesign.com/catalogue/id_151608_ashley.pix

font - Coffee at Midnight (you can get this at DaFont.com)


filters
eye candy 4000-gradient glow (credits)

okay lets begin


open a transparent image 800 x 800
(we'll crop it down later,i just like to have lots of room to work)

c&p ele 12 resize by 70% 1 x

center in image

magic wand , mode add (shift) match mode RGB value tolerance 0 contigious checkedfeather 0 anti alias checked outside

click in center of frame, selections,modify,  expand by 2 c&p ele 7 selections invert delete, select none, drag paper under frame 

top layer, c&p ele 63, place on bottom left hand corner, resize by 70% 2 x sharpen add DS of choice

c&p ele 65, resize by 70% 4 x, sharpen, add DS of choice

c&p ele 99, resize by 70% 3 x (or your preferred size) sharpen add your DS, place behind the coffee beans

go to frame layer, c&p your tube so it looks like shes right on top of frame slightly, sharpen add DS

frame layer, magic wand, c&p your tube close up , selections invert, hit delete on keyboard, select none, 
layer properties soft light, add DS

top layer, c&p ele 89 resize by 70% 2 x place on bottom right side of tag, sharpen, add DS

c&p ele 91, resize by 70% 3 x and place beside coffee pot, sharpen add DS

now you can crop it to any size you like, merge visible, add your credits and license info, copyright info, i usually resize mine to 550 width the height will automatically resize, you can use a thin white gradient on your credits or a white drop shadow to make it more clear. you can also use a thin gradient glow on your name too

merge visible , save as png  

thats it! you are done, i hope you enjoyed this tutorial


Lavender Coffee Ashley
by Ladyjai3Creations
September 2024


Sunday, June 23, 2024

Pearl in the Shell snags


here are some new snags that go with my tutorial, Pearl in the Shell

tube ©  Alehandra Vanhek

you can purchase this at www.picsfordesigns.com


i hope you enjoy using them


Ladyjai3Creations
June 2024


Monday, June 17, 2024

Blue Jeans Forever tag tutorial


Venus in Blue Jeans tag tutorial
by Ladyjai3Creations
June 2024

you will need

paint shop pro (i used 17)

a scrap kit
i am using Venus in Blue Jeans by Elli's Creations
you can purchase this at https://www.digitalgraphicdesigns.com

filters
eye candy 4000- gradient glow (for designer credits & name)

AAA frames- foto frame 

font- i used sloop script three - i got mine at DaFont.com

okay lets start

open a transparent image 400 x 275

resize paper 1 500 x 500

c&p paper 1 onto canvas

c&p ele 84 onto canvas resize by 70% 2 x and place on right side of tag, sharpen add DS (your choice)

background layer c&p ele 34, resize by 70% 3 x and place on sidewalk, sharpen add DS

eye dropper tool, take a dark blue color from your tube, (i used the blue in her shirt)

image add borders, symetric checked, blue, 2 

take a light blue color from your tag, image add borders the same but with the light color

image add borders, symetric checked, dark blue, 3 

AAA frames- foto frame- width 10, opacity 80

image add borders, symetric checked size 3, light blue

add your designer info and your own taggers watermark, you can use a rthin white gradient on the designer info if you wish, merge all flatten, save as jpg


thats it! you are done, i hope you have enjoyed this tutorial


Venus in Blue Jeans tag tutorial
by Ladyjai3Creations
June 2024


Friday, June 14, 2024

Pearl in the Shell tutorial


Pearl in the shell tutorial
by Ladyjai3Creations
June 2024

what you will need

paint shop pro (i used 17)

font i used for my name is Seawolf
i also used a small light blue gradient glow on my name too

a tube
i am using an older tube by ©Alehandra Van_Hek
Pearl in the shell available at PicsforDesign.com

i used the blue layers for this, with blonde hair

filters

eye candy 4000- gradient glow (copyright info) 

foto frame -width 10- opacity 80- all other settings on default

filters unlimited 2.0- distortion filters- smelter- default setttings


okay lets start

open a transparent image  400 x 275

eye dropper tool, take a light blue color for foreground, darker blue for background

make a gradient of those colors angle 36 repeats 2, flood fill with the new gradient

layers, duplicate, image mirror, bring properties of layer down to 50

image mirror, merge down

filters unlimited distortion filters- smelter- default setting

c&p your tube, resize as desired, place on right side of tag, sharpen, add DS, V 2 H-2 Opacity 68- Blur 7

go back to your tube, image mirror, c&p tube on the background of your tag, blend mode overlay, bring properties down to 65

top layer,image, add border, symetric checked, 2 use a darker blue for the border

AAA frames, foto frame, width 10, opacity 80, all other settings default

image add borders, light blue color, symetric checked  at 3, 

add your copyright & license info, and your own taggers watermark. save as jpg

you are done! i hope you liked this tutorial and it was easy to follow


Pearl in the Shell tutorial
by Ladyjai3Creations
June 2024